

308. Rim Beveling and Chamber Advice from the Pros on A Late Republic X220

The CPG Pipes have been completed and are enroute to their SPC and SPEu destinations for processing. I’m hoping they will be ready around November 1st – 7th. I will send a link to each Pete Geek who ordered a pipe to the appropriate site for check out. After receiving your pipe, if you want a CPG certificate or Merit Badge to add to your existing certificate, send a photo of yourself with your pipe or your pipe against its box and bag to petegeek1896@gmail.com.

This morning I’ve got two easy DIY techniques new to me, one from pipe refurbishing master Steve Laug and the other from world-class pipe artisan and head of SPC’s Estate Pipes division Adam Davidson. If you’ve followed the blog for long, you know I enjoy simple pipe restorations, ones that can be done on a table top in your apartment or flat without raising the hackles of its other inmates and within the reach of almost any pipe smoker. I’m drawn to well-beloved, dirty pipes that are sound under the grime, ones that need cleaning, deoxidation, a bit of sandpaper and buffing.

I fell in love with this X220 Kildare as soon as I saw the gigantic elephant trunk of a stem. I suppose it’s why I have a soft spot for the 339s, original 9BC, John Bull 999, SH Hopkins and other chubby Petes. The stem is simply so Irish, so gigantic when compared to English pipes. As the Kildare line only appeared in 1965, the pipe can’t date before then and like the XL339 may well have been made sometime in the 1970s or even early s’80s.
When the pipe arrived and I could take a good look at it, I saw it had been reamed and partially cleaned before selling—something I see quite a lot of in eBay’s estate Petes.

I always like to take digital photos and look at them on my computer—the digital darkroom—to make an accurate assessment of what a pipe needs. By “darkroom” I don’t mean you need a commercial-grade Photoshop set up. Just having a cellphone with a good camera can really help. This photo was taken with an iPhone 13 Pro, which I often use to do micro nature photography.The big thing with a phone camera is to make sure you’ve got some good lighting and a steady hand.
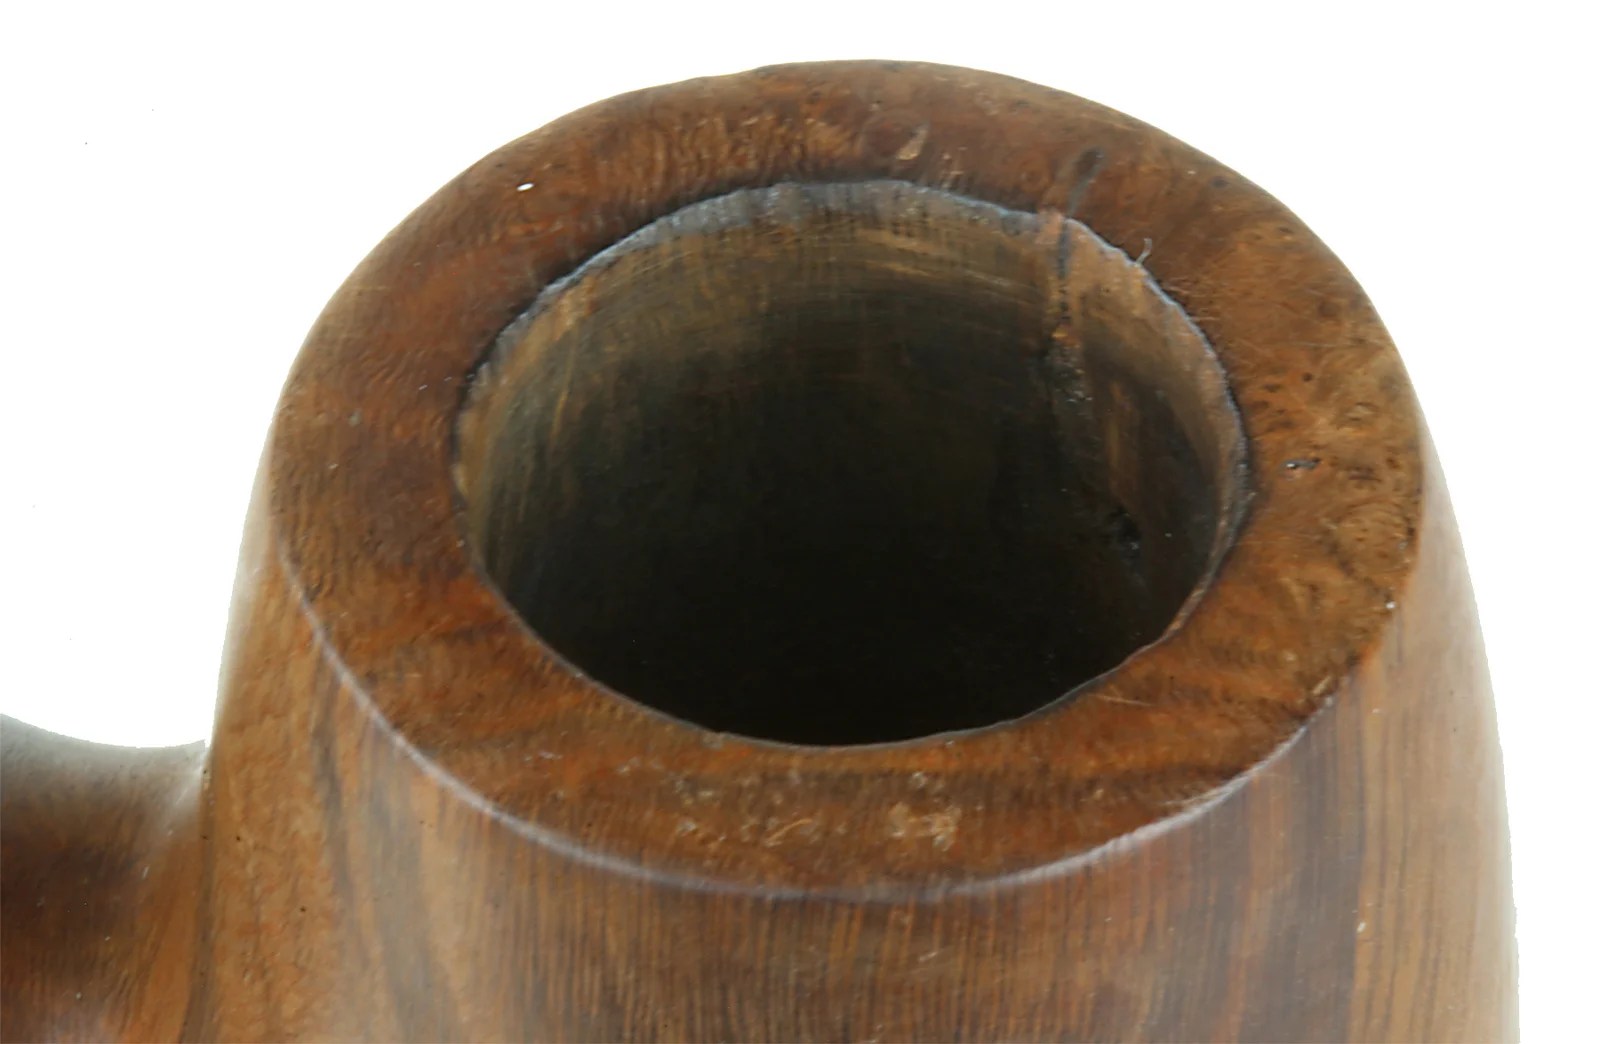
In the photo above you can see where the previous steward’s pen knife had cut into the inner rim as well as a small meteor shower on the reverse rim. The photo below shows where knocking the pipe out has rounded down the edges. I’ll say this for him, he achieved a really uniform knocking, beating it all the way around the rim.

When you see an estate with these kinds of issues, you know you’re dealing with a “previous gen” pipe—no one from the 1990s onward deals with their pipes in this manner, which seems almost barbaric to us but which was typical for most briar pipes before then.

Sometimes, though, a good digital camera mounted on a tripod is needed to catch everything. These two photos, one taken from the obverse and one the reverse side, gave me a better idea of the rim gouging (lower photo) and showed how a fill down a few centimeters has dropped out and is somehow connected to the imperfection that continues up in a line over the top of the rim. No worries here, as the pipe has been smoked for 60 to 70 years with no problems yet.
So there’s five easy jobs here: the rim top, a bevel to remove the out-of-round inner rim, the hairline crack, restoring the outer bowl and prepping the chamber.
I applied a small dab of CV glue in the fill and hairline—just to be on the safe side—with a tooth pick, leaving me four jobs, all of which I enjoy.
RIM TOPPING
The rim needs a very light topping to remove the meteor shower as well as 70 years of beating down rim’s edges. As I’m going to bevel the inner rim, I need to do this topping first.

I’m sure I’ve told you the story of this 307. I was so excited. I thought it was a System shape I’d never seen. It’s a beautiful shape, but as more experienced Pete Geeks kindly explained, the pipe had been subjected to a massive barbeque burn down one side and received a massive topping.

My toppings are usually between 1-2mm, which doesn’t sound like much but can transform an old pipe into a new-looking one. Being careful to apply equal pressure to all parts of the rim, I go from 100 to 150, 220, 400, 600, 1000, 1200 and 1500 grit paper all on a flat surface, pushing the bowl into the sandpaper on the table. Then I’ll go on through the MicroMesh pads. It always surprises me to see the color return to the rim when I get toward the end. Why does it do that?
While everyone has their own technique, I’ve learned to do almost all my topping with the 100, 150 and 220 grits. I rotate the bowl, pushing it into the paper, as well as sometimes pull the bowl across the paper up and down then side to side. Of course you want to “go slow and work like a pro” as Ken Siegel says, watching the edges of the rim.

As soon as the outer edges succumb to the 220 grit, most of the work is done. I continue on through the MicroMesh. Using the MicroMesh pads, I place the bowl onto the pad and push the rim into the Micromesh Pad in a circular motion. The pads soften the outer rim edge just enough to keep it from getting dented. A flat crown with a very, very-slightly soft edge is how OEM Petes seem to be issued.

In case you’re interested, the original bowl height before topping was 50.2mm. After all was done, the height was 49.9. So it only .3 mm, a variant one might even find among different new bowls coming from the factory.

RIM CHAMFERING
Before this pipe, chamfering the rim has always been a bit of a problem. I’ve used dowel rods wrapped in sandpaper, but there’s no way to control the lopsided circumference where a penknife has pushed the inner rim out of round. This time I have a new tool: the wooden ball! This tip was given to me by CPG Ken Siegel, who had it from the Guru and Father of Home Refurbishing, Steve Laug. Steve posts so many refurbishing projects that he’s forgotten more than I’ll ever know about the subject.

The principle is simple: wrap the sandpaper as best you can around the ball and twirl it into the rim. This photo shows the first few passes at 150 grit, before the entire bevel was cut. I went a few more passes before continuing to 220 and then 400, by which time the bevel was 95% cut. I followed with 600, 1000 and 1200 grit paper. The stiffness of the sanding paper took off the previously smooth-sanded surface and made a slight convex shape on the top of the rim in addition to making a great and uniform bevel. But no worries, the top rim was quickly brought back by going again through the grades of paper.

I used a 1 ½ inch ball from a pack of five I bought from Amazon for $10. It worked great, although I think I’d like to add a 1 1/4 or 1 inch ball at some point, which might not leave me with the task of re-sanding the rim. No matter, it came out looking great.
THE BOWL
To give an estate a really new look and feel, light sanding is a must. You won’t have to restain—at least on a brown-stained pipe. I begin with 400 grit wrapped over a MicroMesh pad followed by 600, 800, 1000 and 1200. I don’t go over the stamps with any of these grades, as I don’t want the stamps sanded down. Then it’s on the MicroMesh, and here I do go over the stamps, being mindful when the pad is on one of the stamps. My goal is simply to create a uniform finish, not remove the stamps.
In the past, I’d then go on to buffing, either with carnauba or, of late, with white compound applied using the edge of my little 4 inch Foredom wheel followed by carnauba. You need both if you’re going to create a factory sheen. Just the white compound won’t do it and you may be a little dismayed if you don’t know to follow it with the carnauba.

However, before using the white compound and carnauba, this time I decided to get out LaBelle Epoque’s Before & After [Briar] Balm. It’s been in my tool kit for a while, but I’ve never used it. I know Steve Laug uses it on everything he does. As you can see, it produces a soft, matte glow which many pipemen prefer. I really like the rich depth the balm brings to the wood.
It does take about 24 hours to dry, which is something I had to learn by myself. You’ll know it’s dry when when your fingers quit smudging the surface. After drying, I applied white compound (using the edge of the little Foredom buffing pad) followed by carnauba. I just love bringing a pipe back to looking as near new as possible.

The purpose of the white compound and carnauba (as I’m sure I’ve said before) is to fill in all the tiny scratches and make a surface reflect all possible light.

THE CHAMBER
I’ve been touting K&P’s bowl coating for a while now, but this time I decided to use Adam Davidson’s chamber and airway routine. I recently acquired an Irish Whiskey 120 dublin estate from SPC and was so amazed at how clean the pipe smokes that I had to write a fan letter and ask Adam how they do it. Here’s what he wrote back:
“While I would like to tell you about our trade secrets, we really don’t have any! Possibly one or two, but not really. The guys clean the chambers as best they can with reamers and our oyster knife reamers to remove most if not all of the cake, and then wipe the chamber clean using only water. The bowls are held upside-down over a sink and we wet our fingers under the running water and just wipe the chamber with wet fingers. This allows us to feel any area we missed reaming (and address it), and also removes all of the dust from reaming. The chamber is upside down to prevent any water from running into the shank in case of an extra wet finger. This assures when someone buys one of our estate pipes it’s clean to the touch.
But really, all of the pipes are simply reamed, chambers wiped clean, and shanks cleaned with alcohol (sometimes after using a 4mm reamer to remove gunk), plus stems inside and out. We try to remove as much from the previous owner as possible and leave no signs of ourselves. However; if someone smoked nothing but heavy latakia or aromatics in a pipe for years it will likely remain, but it’ll be pretty.”

The first thing I tried was in Adam’s 2nd paragraph—something I’m sure everyone but me does, but somehow this never hit home before now. After scrubbing the airway lightly with a shank brush dipped in alcohol to soften up the oils and tars, I used the “reamer” (actually the one in the handle of my Senior Reamer, although you can get a dedicated one like the 8deco 4mm above for $10 from SPC) through the airway.
I was astounded at how much tar was lodged in the bit’s spirals. I did this a few times, removing the tar on the bit each time, then went back to the shank brush, bristle cleaners and smooth cleaners. Wow. That airway is clean. I suspect this is where a lot of foul taste comes from not only in my newly-purchased eBay estates but also from my own rotation that I’ve smoked and smoked but never cleaned in this manner.
On to Adam’s first tip. As I said earlier, the chamber was already 90% reamed, so I simply used some 220 grit wrapped around a pencil shank to address the places I could still see vestigial cake clinging on the wall. Then I wiped out the chamber with a wet finger, upside down, over the sink. That didn’t take long but I was surprised at just how dirty the water was. I never thought before about removing all the dust and cake debris simply by applying water and how (d ’oh!) removing that dust would also affect the taste of the first smokes.
I’ve now acquired one of Adam’s “oyster knife” reamers, which SPC has obligingly put on the market for us as the “Low Country Reamer.” I wouldn’t suggest beginning with something like this if you’ve never reamed a chamber. Until you develop a sense of what’s what, you should go with either the adjustable Senior (which has a 3 or 3.5 mm bit reamer for the airway in the handle) or the incredible PipNet. , which has been around for decades and is sometimes found on the estate market.

And that’s it, aside from the stem. While this is a P-Lip stem and the bowl has a reservoir, I wanted to enhance the airflow with a tenon chamfer. Strictly speaking, there was no need. But I’m to the point in my smoking career now that it’s just fun to see what can be done.

You’re going to wonder if this improved the smoking qualities. I wish I could tell you, but I didn’t smoke it before doing the chamfer. I can say, however, that I’ve smoked this pipe almost a dozen times since I did the restoration and it’s an amazing smoker, quite cool and smokes as well as most of my Deluxe Systems.
The stem went into the gooey mess that is Deoxidizing Solution and came out black. I’ve found the stem benefits from an overnight drying before buffing. There was some light dental chatter near the button, which I sanded with MicroMesh pads up to 15K before buffing.

One more thing. Many times the impressed P logo isn’t deeply impressed or has been buffed so that there’s not a uniform P. This time I was in luck and it was quite deep. Having carefully buffed so as not to lose that depth, I applied gold acrylic paint with a toothpick. I like this stuff, available at hobby and craft stores, because it’s water based and I can dab off the surface paint with a tissue then reapply. It also dries slowly enough to flake off the paint on the surface with a finger nail and not mess up the stem finish.

The proof of the pudding is in the eating, or smoking in this case. It’s been a few weeks now since I did the restoration and I’ve smoked it several nights since then, which doesn’t often happen when I restore a pipe. Its strong visual appeal and amazing smoking qualities doubtless account for that.


Parting Shots
CPG Scott Forrest sent me these (the photos, not the pipes). Try not to drool on them.


…and one more thing:
 This magnificent 3-pipe ceramic rack dates from the Dublin Era. It was accompanied by a single-pipe ceramic rest as well as an ashtray. CPG Andrew Moultrie sent me the link, as I couldn’t find it for post #307 and thought SPEu had sold out. But no, you can find it here for 24.39 €, which seems like an amazing bargain. It comes in a well-padded luxury fold-down box. Mine made it all the way across the pond with no mishap and I love it.