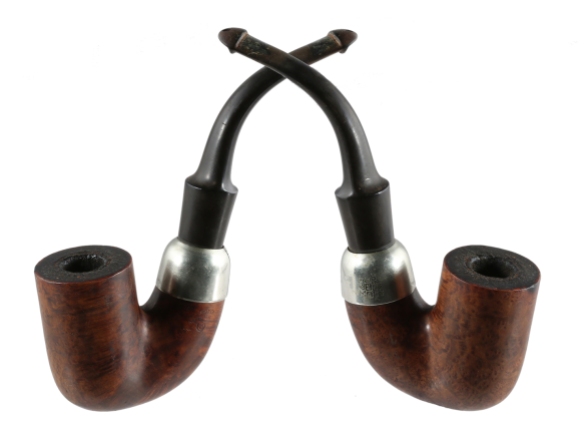
 I had thought to finish up the B shapes this time around, but placed a half-serious bid on eBay and found myself the winner, to my consternation (at first), but delight (on actually examining the pipe). Sometimes the most exciting auctions seem to involve sellers who don’t know what they’re selling or auctions with photos that are just fuzzy enough to create a certain amount of uncertainty as to what, exactly, the shape is, or what condition the pipe is in. I thought it might be the O2 house pipe (that’s “O” for “oversize,” as we explain in the book), and in a moment of madness bid on it, although I rarely smoke such behemoths. I fully expected to be outbid as the auction had 5 days left to run, but no one did.
It didn’t turn out to be the O2, but a shape I reach for much more often, the first, chubby version of the 02. This is Peterson’s classic Oom-Paul shape, going back to the patent shapes of 1896. I love the size of chamber on these pipes, which is usually about 19mm x 48, one of the best in my smoking experience for Virginias and VaPers.
 By the 1937 catalog the original 02 shape had three numbers: 02 for DeLuxe, 305 for 2nd grade, and 356 for the 3rd grade – 2nd being today’s Premier, 3rd being today’s Standard. One of first things I knew we needed for The Peterson Pipe book was a cross-reference shape chart of shapes that bridges System and Classic Range, and just last week I had a question about an unfamiliar System shape that turned out to date from the 1930s.
 I have a hunch based on the Peterson ephemera and the 02 shapes I’ve seen that sometime during the 1940s the original chubby 02 was modified, slimming down the shape, but not the chamber size, as you can see in the Shamrock 02 photo above. My reason for believing this has to do with the disappearance of the chubby original 02 shape from the catalogs after 1937, the appearance of the 02BB shape in the 1940s, and the transition to simply the 02 number before it was finally discontinued in the c. 1973 Associated Imports catalog.
 Why the “BB” you may ask? I can offer you my fairly educated guess: the second “B” just stands for a tapered stem (fact), an old Peterson practice still in use with saddle stems, which are marked “S.” The first “B” (supposition) stands for a tapered bowl. Like I said, that’s just a guess, but until I get another chance to dig through the Peterson archives, I suppose it’s as good as anyone’s.
 When the pipe arrived, I was delighted to find it stamped IRISH FREE STATE, which means it was cut between 1922 to 1937, although my co-author has never logged a hallmarked IFS early than ’27. Even so, to companion and smoke a Peterson that’s going on 80 years old is a marvelous thing. The only rarer COM stamp would be the EIRE, that short period from 1938 – 1948.
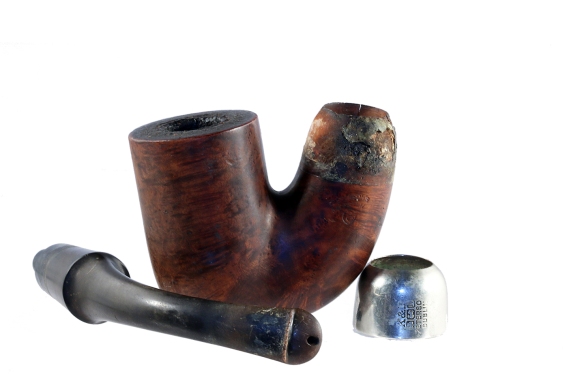 As received, the 356 wasn’t in anything like the condition that Steve Laug routinely deals with on a daily basis over at Reborn Pipes, but in what I call the “well-beloved” state, meaning that while it looks pretty nasty, the owner actually took extremely good care of it, apart from neglecting to ream the carbon-cake! Some dental chatter, lava flow, extreme cake, a small burn mark at the front of the crown, and some small cracks under the ferrule at the mortise are all I had to contend with, all well within my DIY skill-set. The vulcanite testified to use, but not abuse, and certainly hadn’t been out in daylight for a long while.
The wood itself is what I call “classic standard-grade Peterson” – good, strong birdseye covering most of the bowl, and better than many, many Standard Systems. The only fill – and what made it a 3rd (Standard) grade – is on the back toward the mortise. It is fairly small, black and still strong after all these years, so no need to pick and refill it.
 The three cracks at the mortise deserve mentioning, because the 02 shape, like the 14, has an enormous opening here, making the briar extremely thin. It’s not surprising that the company eventually moved away from such extremes, although I wonder (as I always do) how this gigantic opening and its accompanying reservoir impacts the smoking qualities of the pipe. I know my System shape 14 pipes (which have the same huge mortise) perform extremely well.
 The ferrule was loose, and on backwards. I had worried from the eBay pictures that the soldered band was cracked or had been inexpertly repaired, but such was not the case – it had just discolored, as solder will do on a nickel band. If you’re new to the world of vintage Petes, you can expect such solder marks as an indicator that the pipe dates to before 1963. I was surprised by the brass color of the solder, as when most old Pete bands are polished up, the solder simply disappears until the band becomes oxidized again. Doesn’t look like silver, doesn’t it? Metallurgists (Al?) can you shed some light on this?
 You can see in the various photos the discolored white glue the craftsmen used to seat the ferrule. I’ll use Liquid Nails to re-seat it onto the stummel, because I’m in the habit of polishing Peterson bands with a silver cloth on a routine basis, which can break the hold when using white glue. On Al’s advice, I wasn’t as aggressive in polishing the nickel mount this time, and while Fabulustre didn’t quite do it for me, white diamond did enough to keep me happy & keep the nickel intact and the nomenclature clear and crisp.
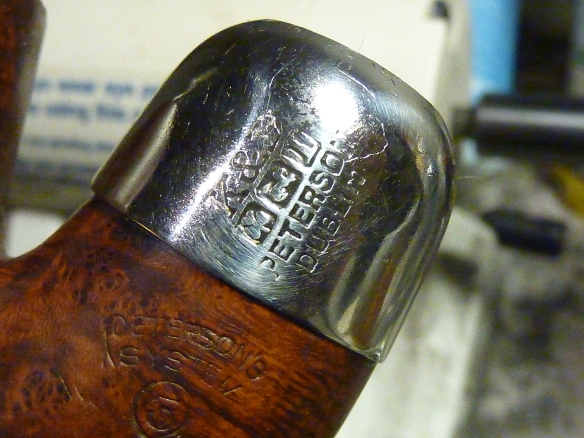 Also notice that on these hand-soldered nickel mounts, a bevel has been turned down where the band meets the wood, something you unfortunately don’t see on post-1963 machined-pressed nickel mounts.
 The bowl smelled like its previous companioner had smoked non-aromatic tobacco, and using the smallest head on my PipNet, it came out like sand with just gentle turns, telling me the pipe had not been smoked in many years. No heat fissures beneath, and a pleasant smell, so I opted for Steve’s trick of using cotton pads instead of sea salt for an overnight alcohol soak. It passed the olfactory test the following morning, and when I cleaned out the shank it also didn’t take much – a tube-brush scrub and 7 or 8 pipe-cleaners and it was clean.
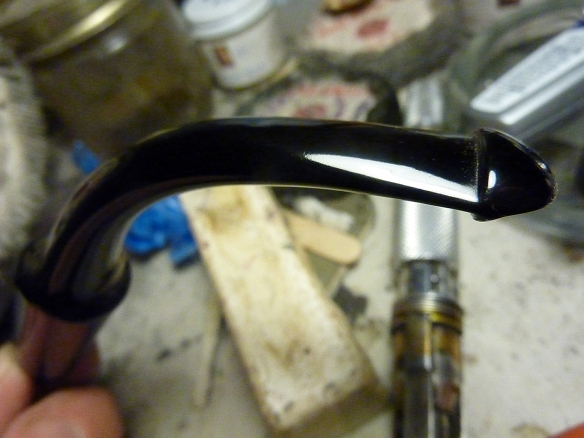
 As a help to those interested in such things, I include a side-by-side comparison of the tenon end of the mouthpiece with a recent-production mouthpiece: the tenon extension juts straight out on the recent one, but is conical on the original. Note the width of this thing—6.5 mm!
 The rule of thumb for a System graduated mouthpiece is 1.5 mm at the button, 5 mm at the tenon. (And no, if you’re wondering, the old Systems never had filters.) Premier and DeLuxe Systems dating from the same era would have had hand-cut vulcanite stems with screw-in bone extensions, if they had not been erroneously removed by unknowing owners.
I’ve become convinced over the years that a tight fit on the mortise-tenon juncture is essential to good performance on a System (or any army mount): it creates a much better, cooler, more flavorful airflow. One way to spot a replacement stem is simply to notice the fit. An original will probably bear a ring scar from where it hits the ferrule. A replacement won’t seat as well. This is one reason the company won’t just send customers a mouthpiece: they know it needs to be fitted by hand, by an expert.
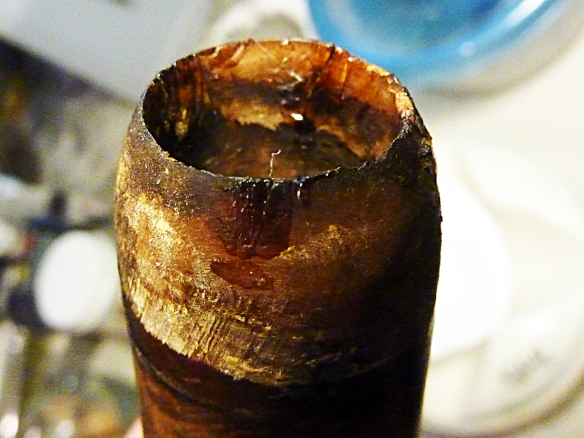 I decided to strengthen the three hairline cracks in the mortise with clear CA glue. Not really necessary with the ferrule glued over it, but as long as it’s off, it’s just a bit of extra insurance to prolong the life of the pipe. While the excess glue wouldn’t show, I did need to smooth off the excess glue on the inside of the mortise (with a small dowel and 220 grit) for the tenon to fit securely.
I was careful not to soak the crown of the pipe long enough in alcohol to lighten the stain around the top. The original 3rd Grade Systems, according to the ’37 catalog, were stained “medium walnut.” One of the things I don’t like about many restorations I see is that, in re-dying a bowl, the original grain is often obscured. Fortunately, I read Charles Lemon’s latest post at Dad’s Pipes, and got out the mineral oil instead.
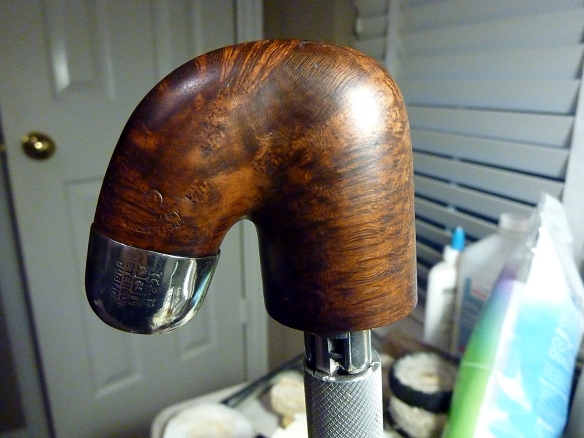 I coated the pipe with a cotton pad, then stood it up in my makeshift dyeing / drying rack (pipe reamer inserted in beer bottle). I had intended to go back and wipe it down, but got distracted, and when I came back, the wood had soaked it all in! More importantly, it was gorgeous. The following day, I applied some carnuba with the Foredom to let the oil set up a bit. This was a revelation for me. I’ve never seen carnuba take to a Pete bowl like this before, and all I can conclude is that the mineral oil was the magic here. Charles, I am indebted to you!
I’ve learned from bitter experience that breaking in a pipe this old can be every bit as hazardous and worrying as any new pipe, so I gave some thought to giving it a very light coat of pipe mud, just enough to help get the new carbon cake started and prevent undo any heat from burning the bowl. I say this because I once companioned a Patent pipe, which I had paid dearly for, only to have a giant burnout develop down at the airhole. It was devastating to think I’d mucked up a 100-year-old pipe, and so I’ve vowed to take much greater precautions with old wood ever since. I don’t like the taste of cigar (being mostly a Virginia user), so I decided in the end not to apply it. I hope I don’t live to regret that decision! If anyone has suggestions for breaking in old briar like this, please let me know. I can use all the help I can get.
The stem work was routine – after internal cleaning, I pulled out nearly all the dental chatter with soft passes of the lighter. I’m more a preservation than a restoration guy, so I left two little dents on the bottom of the button rather than resort to CA glue.

 I soaked the mouthpiece in Oxyclean for about 4 hours, then went to work with micromesh pads. This time I thought I’d try wet-sanding with each grade, just to see if the work went more quickly. I confess, this is the most tedious part of the job for me, but I hate stems that are still brown under the shine. I’m sure it was hard on the pads, but the work went much quicker, and while I stopped (again, like my hero Steve) between every three grades to wipe it down with Obsidian oil, the results were noticeably better than usual, so I think I’ll make wet-sanding a habit.
 The bend on the stem does not conform to the 1937 catalog, giving the pipe an extra .25 inches in length over a similar 356 with the 1937 bend. I decided to leave as it was.
 P-Lip army mounts are among the worst to restore, at least for me, because of the P-Lip and the shoulders on the mount. I always seem to have a fine light brown haze around the shoulders and a thin brown line at the juncture of the upper and lower walls of the button. This time I used a small diamond file to carefully cut through the oxidation on the walls at the button, followed by careful use of a split 2400 micromesh pad, before running the gauntlet from 1800 to 12,000. It’s been my experience that if you don’t cut through the oxidation at the beginning, you’re going to see it when you’re done. I also put more effort into those shoulders, and I’m pleased to report (as maybe you can see) that under the Ott-Lite, all is a glossy obsidian.
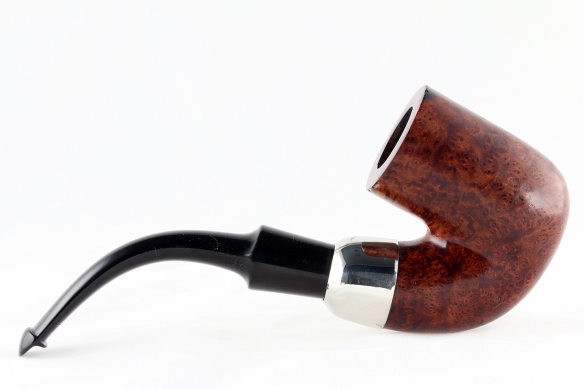
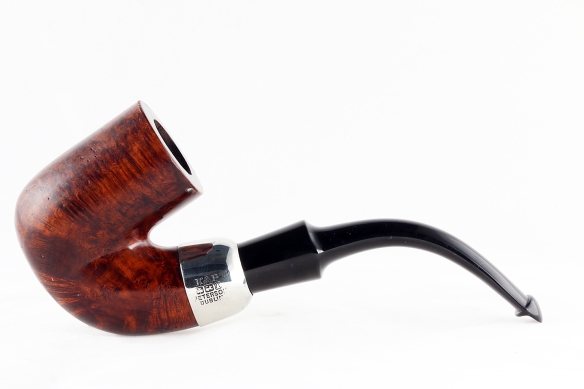
 And finally, the finished pipe:
Cataloging Information
Stamps:
Peterson’s over System (fork-tail P) over 3 (in a circle) on obverse;
356 stamp, lower reverse side of stummel;
IRISH over FREE STATE on obverse of stummel, just below ferrule
Year: Cut between 1922 – c. 1940
Mouthpiece: Probably original
Length: 6.25 in. / 159 mm.
Weight: 2.15 oz. / 60 gr.
Bowl Height: 2.22 in. / 56.61 mm.
Chamber Depth: 1.9 in. / 48.45 mm.
Chamber Diameter: 0.762 in. / 19.35 mm
Outside Diameter: 1.37 in. / 34.97 mm
Shamrock 02 photo courtesy Smokingpipes.com

1. The Oom Paul is my favourite shape (partly because I’m South African like the great Paul Kruger).
2. Learning the magic of mineral oil from Charles was like the Second Coming. It makes a massive difference to briar.
I think you will pleased by some Peterson – Kruger discoveries in the book!
Wonderful reconditioning!
Congratulations!
Thank you sir. Not all my projects do so well.
Beautiful work! What a great acquisition in that 356! I shall keep mineral oil for rejuvenating lackluster pieces.
Thanks, Bryan. Yes, I think Charles needs to get a “Lemon-Patented Miracle Process” concession here. Only thing is, I hear you can’t patent a natural product.
What a fantastic find Mark! Wow, there is a lot to learn here, a well detailed write-up. “One of first things I knew we needed for The Peterson Pipe book was a cross-reference shape chart of shapes that bridges System and Classic Range” This chart will be quite handy indeed! I also appreciated the information on the factory solder work, very interesting details. The outcome looks magnificent to my eye/screen! When I break in an older estate, I make sure to not over heat it, and don’t worry about smoking the last of the bowl. When I’m done, I work… Read more »
Thank you, Al. And especially thanks for the advice on the break-in. I used to think of myself (disparaging) as the Burn-Out King. I’d heard of “ashing” before, but your method makes more sense, and that’s what I’m going to do. First smokes have been excellent, but I’d like very much NOT to get that “burning wood” smell!
Great work, Mark. That vintage Pete is lovely! Glad the mineral oil worked for you. I use it as a matter of course on pretty much every estate pipe I work on. The briar just seems to like it!
Also keen to see that cross-referenced shape chart of yours!
Thanks, Charles. I think every DIY guy who’s read the blog feels the same indebtedness I do to you for your use of mineral oil! Yup, shape chart’s coming. The L&D department is on ch. 5 (of 20) today. We’re rolling along.
is there any problem to overwetting the wood with oil and then sealing it inside with wax?
Seems like it might create extra moisture in the smoke?
Brian, I just saw this and so sorry for the delay in responding. After coating the outer surface of the bowl with olive oil, I don’t let it sit for more than 5 minutes or so, then wipe it off and buff it in. Having done this half a dozen times now, I will say that it’s just as well to let the oil set up on the chamber for a week or so before applying the carnauba. The bowl will lighten a bit, but the grain does deepen and the general visual impression is of a bowl refreshed. But… Read more »